Introduction
Have you ever thought about how cool it would be to make your business cards? There’s something special about adding that personal touch to your cards that you just can’t get from professionally printed ones. It shows you’ve put your heart and creativity into every little detail. That’s where the Cricut Explore Air comes in! It’s like a magic wand for your business card ideas. You’re not just printing cards; you’re crafting a piece of your professional identity. Exciting, right?
The Personal Touch in DIY vs. Professionally Printed Cards
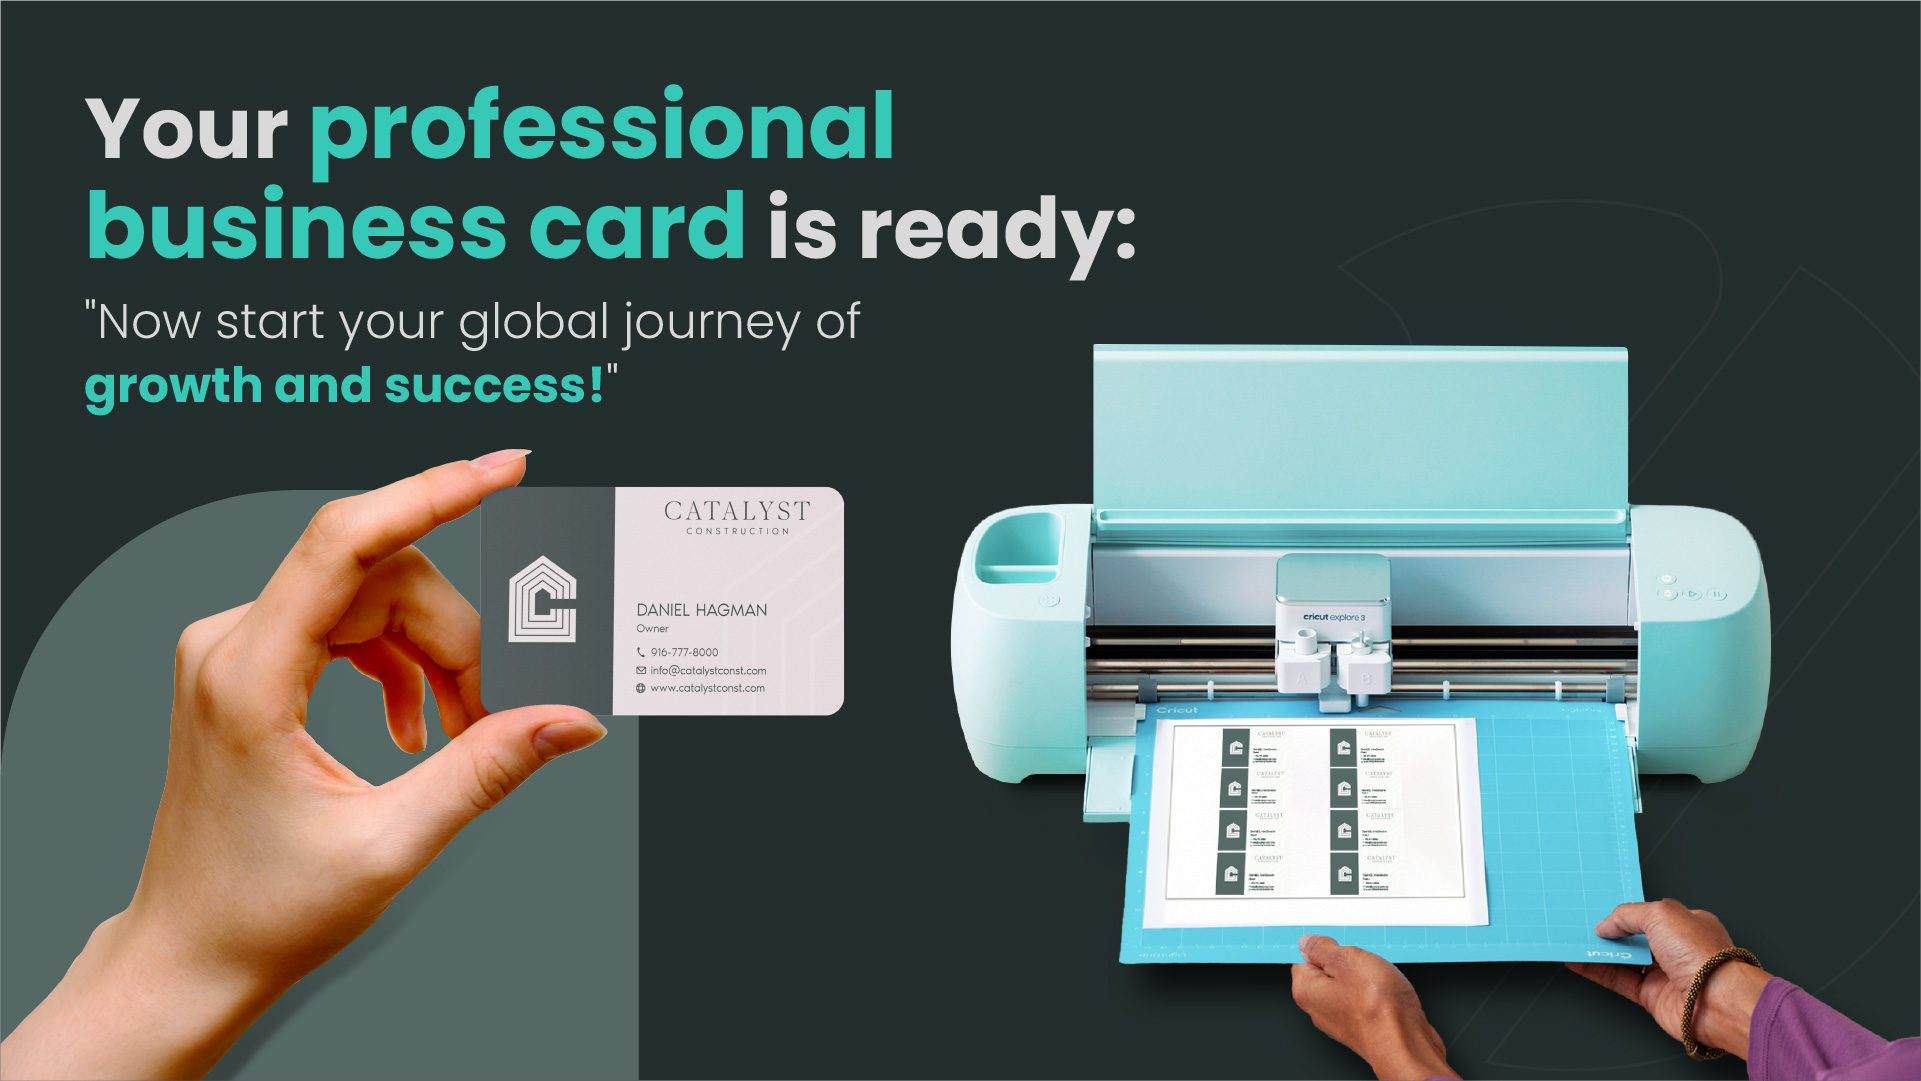
Let’s chat about the charm of DIY cards. When you make business cards with your Cricut, you’re telling a story. Each card is a tiny canvas where you express your brand’s personality. It’s not just a piece of paper; it’s a reflection of you and your business. And guess what? People notice that. On the flip side, professionally printed cards are sleek and uniform – perfect for when you need a big batch with a consistent look. But they might miss that unique, handcrafted vibe that DIY cards have. So, if you are facing some trouble in making your business card design then you can get our services regarding business card design and get amazing designs according to your need.
Essential Tools and Supplies for Cricut Card Making
Ready to start making your Cricut Business Cards? First things first, let’s talk about what you need. Imagine you’re a chef, and your kitchen is your workspace. You’d need the right ingredients and tools, right? It’s the same with making Cricut business cards. Here’s what you’ll need:
First off, the Cricut Explore Air. Think of it as the main character in our story. It’s the cool gadget that’s going to bring your card ideas to life. Just like a painter needs their brush, you need your Cricut. It’s super user-friendly, so you’ll get the hang of it in no time!
Next up, is the Cricut Design Space. Picture this as your secret recipe book. It’s where all the magic begins. You’ll use it to design your card, add your personal touch, and play around with different styles. It’s kind of like being a chef in your kitchen, but instead of cooking, you’re designing!
Now, the Cricut Business Card Template. This is your treasure map. It guides you so you don’t get lost in the world of design. Templates are a lifesaver because they give you a basic layout. Simply incorporate your personal touch. Easy-peasy, right?
Let’s not forget about the cardstock. This is like the bread and butter of your project. It’s the paper you’ll print your cards on. You can choose different colors, textures, and weights. It’s about discovering what aligns with your taste.
Then there are the cutting mat and blades. These are your trusty tools, kind of like kitchen knives for a chef. They help you cut out your cards perfectly. Precision is key here, and these tools make sure your cards look professional and neat.
Lastly, the embellishments. This is where you can get creative. Want to make your cards stand out? Add some special inks, foils, or maybe some embossing. It’s similar to adding the ideal seasoning to a recipe. These little touches can make your cards pop and leave a lasting impression.
So, there you have it! With these tools and a bit of creativity, can you make business cards with Cricut? Of course, you’re all set to make some amazing business cards. As you know the importance of a business card, they’re like your business’s mini billboards. When you meet someone new and you’re like, “Hey, I’d love to stay in touch,” bam! Hand them your business card. It’s got all the important stuff – your name, what you do, and how to contact you. It’s super handy.
Plus, they make you look professional. It’s like saying, “I’ve got my act together, and I’m serious about what I do.” It’s a small thing that can make a big impression.
And guess what? Business cards help you network. They’re perfect for conferences, meetings, or even random encounters at a coffee shop. You never know when you’ll meet someone who could be a game-changer for your business. With a card, you’re always ready to make that connection.
Lastly, they’re great reminders. Ever met someone awesome but then forgotten their name or how to reach them? Yep, happens to the best of us. But if you’ve got their business card, you’re all set. It’s like a little memory jogger sitting in your wallet.
So, business cards? They’re small but mighty. They’re the quiet heroes of the business world, making sure your first impression is a lasting one. Don’t you think they’re pretty amazing?
Listing the Must-Have for Your Cricuit Project
Let’s talk about what you need. You’ll want a Cricut machine (obviously!), some cardstock (choose colors that pop!), and access to Cricut Design Space. Don’t forget tools like a weeding tool and a scraper for those tricky bits. And hey, why not throw some creativity and patience into the mix?
Initial Steps: Designing Your Business Card in Cricut Design Space
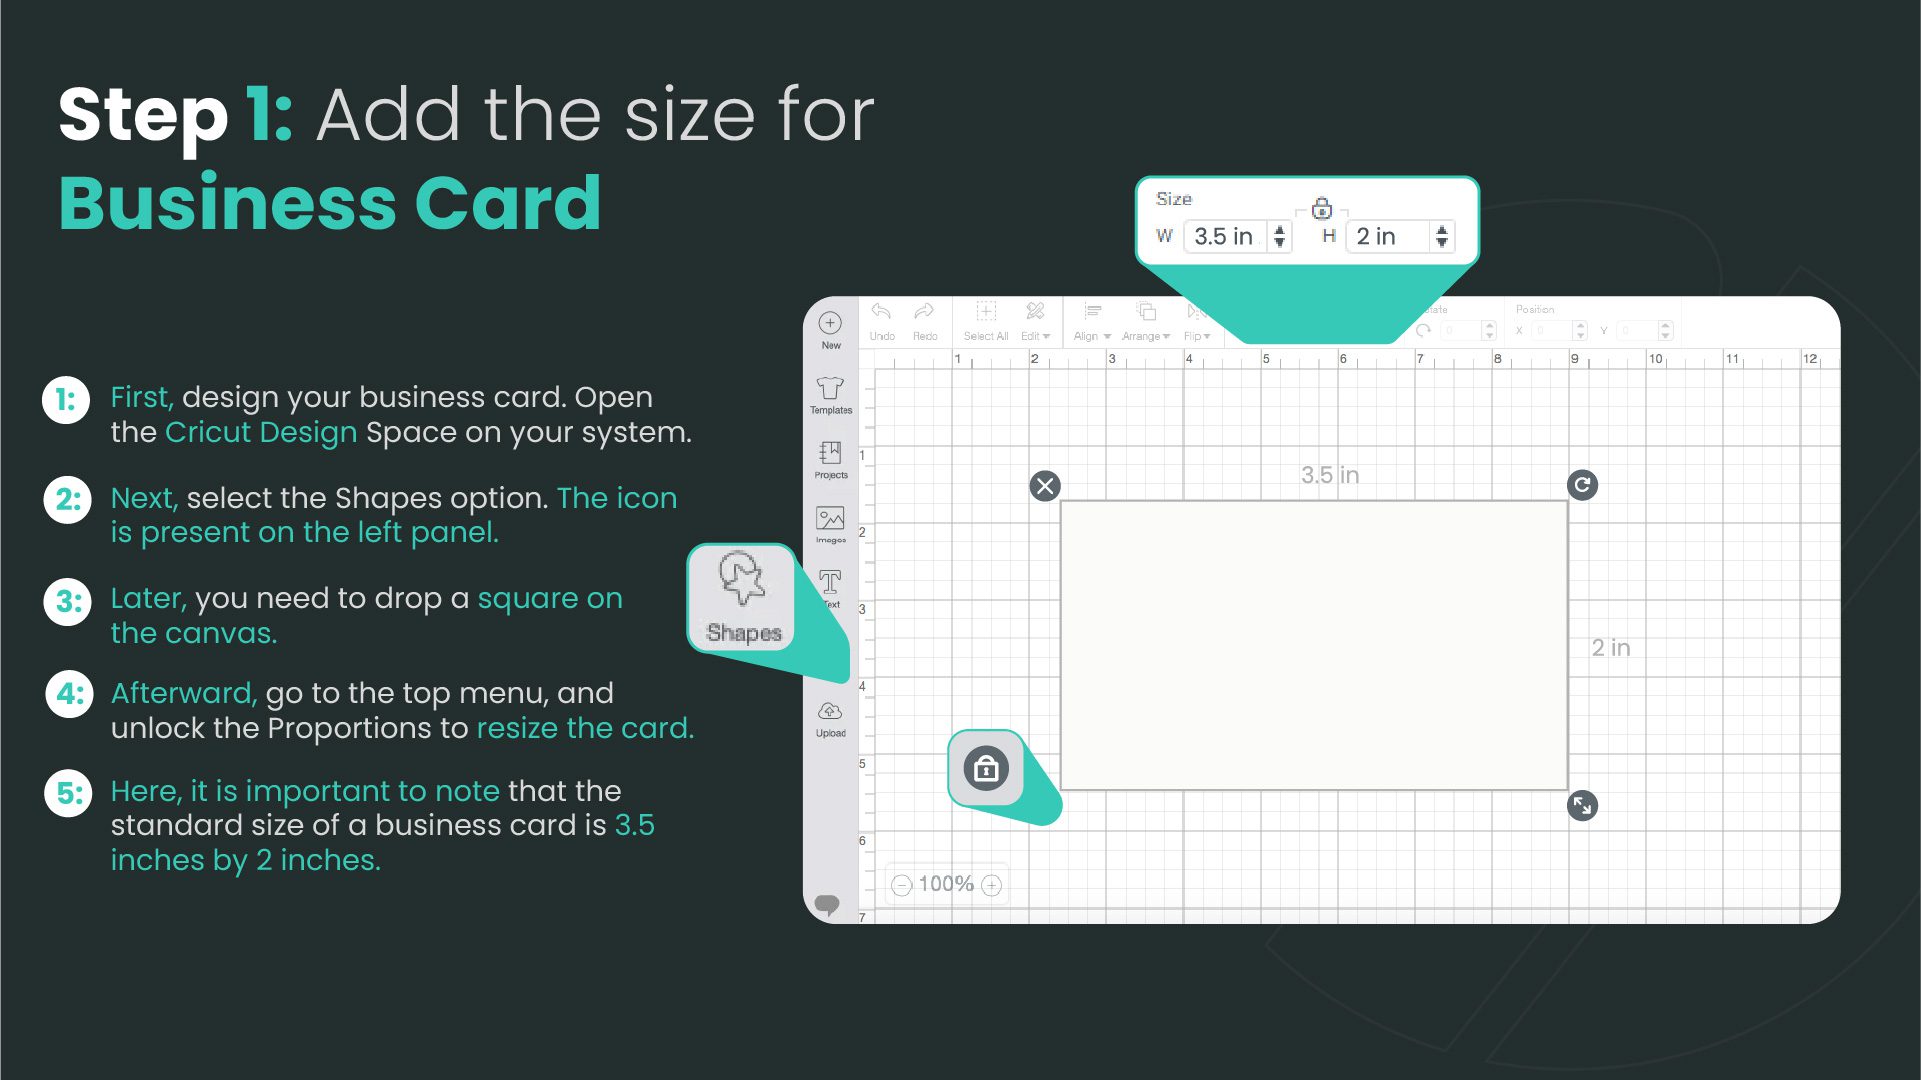
Ready to start? Open up Cricut Design Space and let’s get cracking. You can either use a pre-made template or start from scratch. It’s like a playground for your ideas! Play around with shapes and sizes until you find something that screams “you.”
Creating the Base of Your Card
This is where your card starts to take shape – literally! Choose the size and shape of your card. Most business cards are rectangles, but who says you can’t be a square in a world of rectangles?
Enhancing Design with Contrasting Shapes
Now, let’s add some pizzazz! Use different shapes to create a contrast. Think circles on squares, triangles on circles – you get the picture. This step adds depth and interest to your card.
Incorporating Images and Text for a Personalized Touch
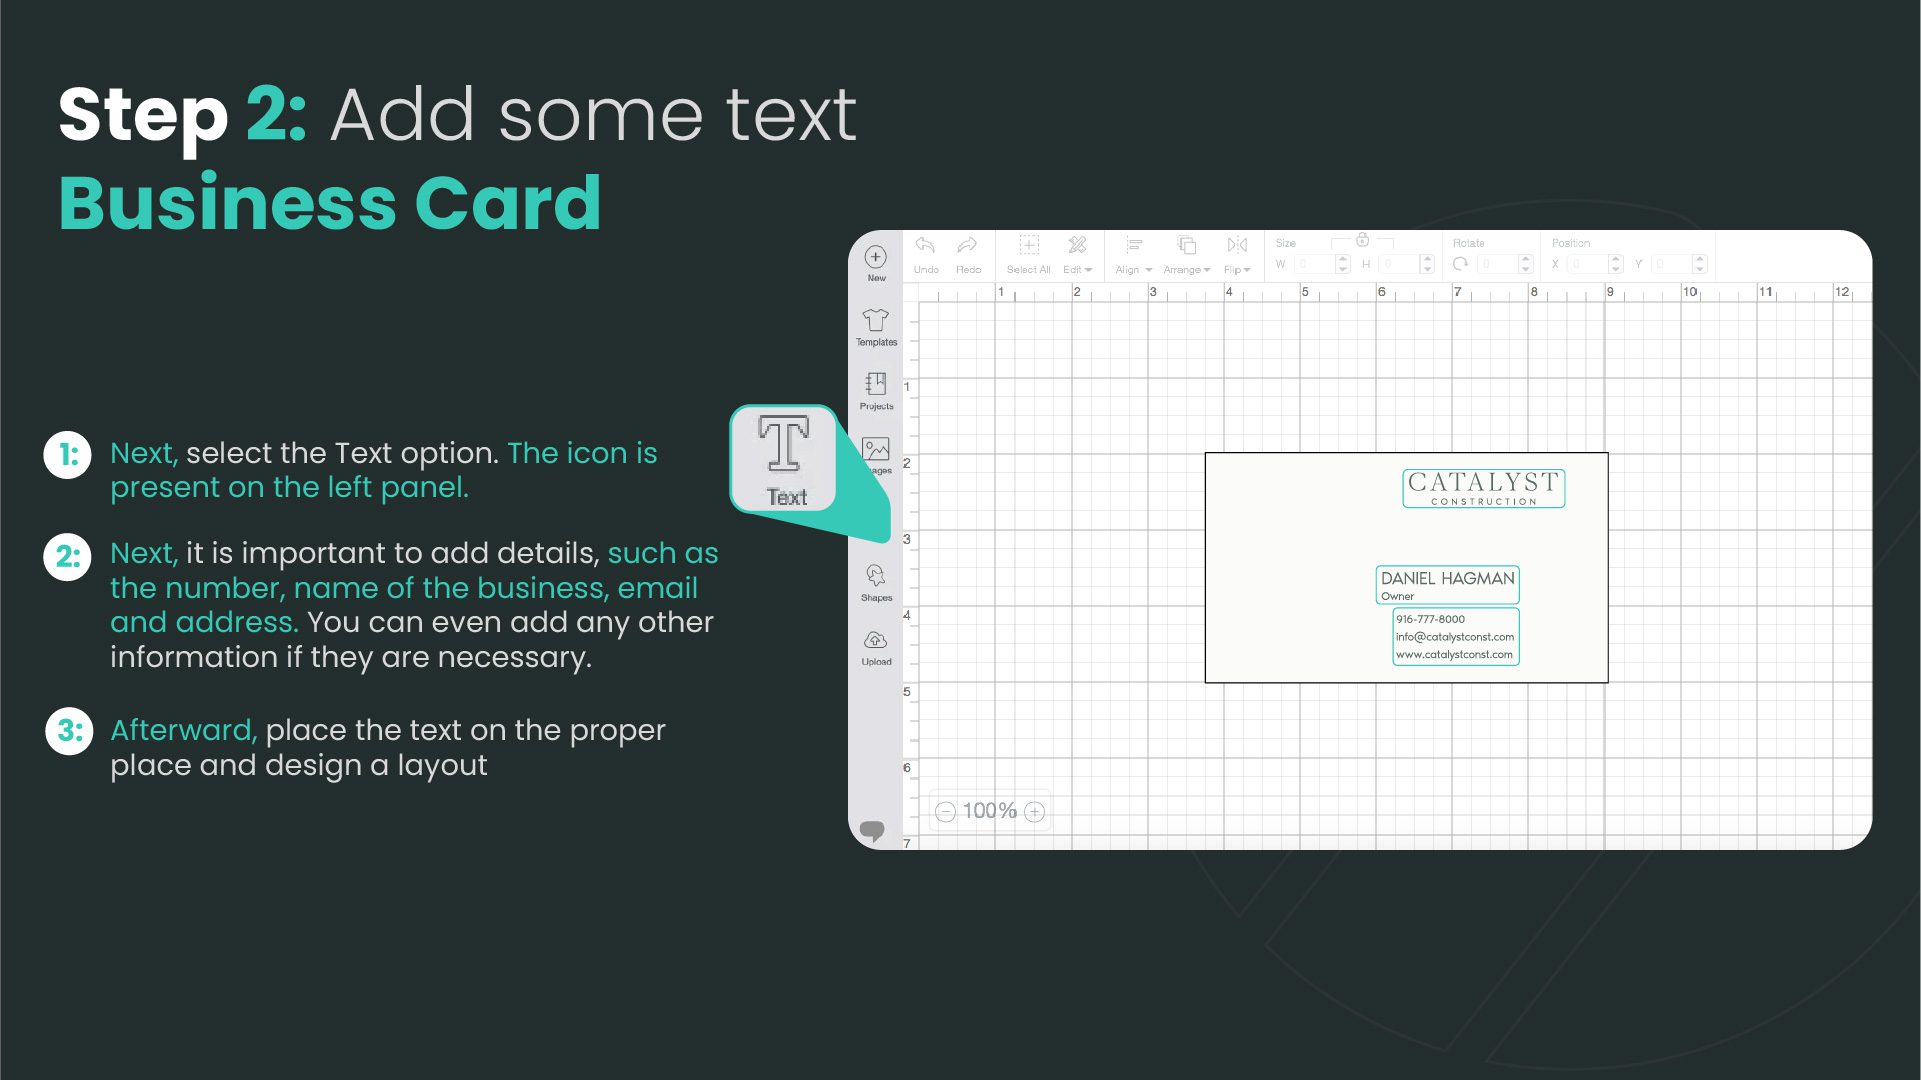
Your card should tell your story. Add images or logos that represent you or your business. And don’t forget the text – your name, contact info, and maybe a witty tagline. Make sure it’s legible and fits nicely with your design.
Finishing Touches: Detailing and Flattening Your Design
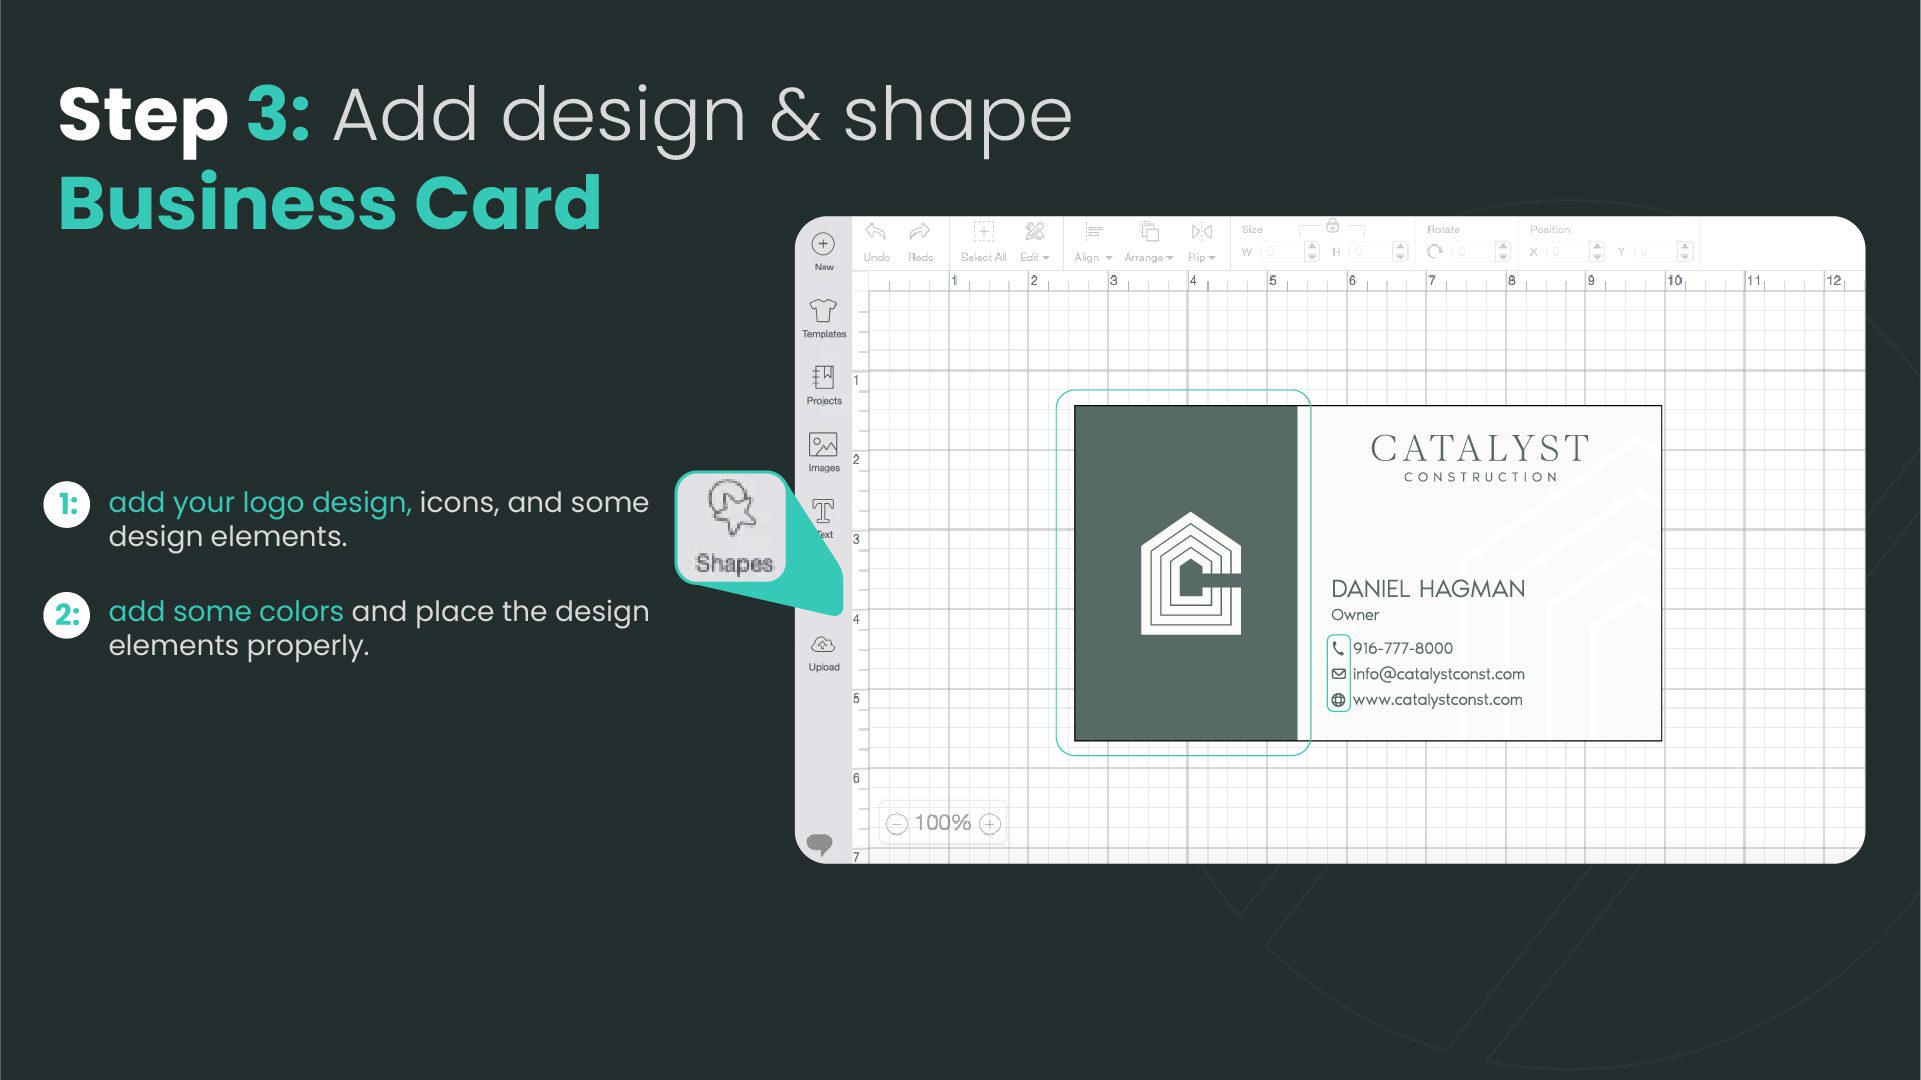
Almost done! Add any final details or embellishments. Then, use the ‘Flatten’ feature in Design Space. This merges your layers into one, making it easy to cut. Voilà, your design is ready to be brought to life!
Now, wasn’t that a fun ride to learn how to make business card on Cricut? You’ve just created a unique business card that’s sure to turn heads. Remember, the key is to let your personality shine through your design. And who knows, maybe your Cricut business card will be the talk of the town!
What do you think you’ll design first on your card? A logo design, your name, or maybe something out-of-the-box?
Alright, let’s dive into this fantastic world of printing, shall we? We’ll keep it simple and fun, so it feels like we’re just chatting over a cup of coffee.
Prepping for Printing: Mat Setup and Material Choices
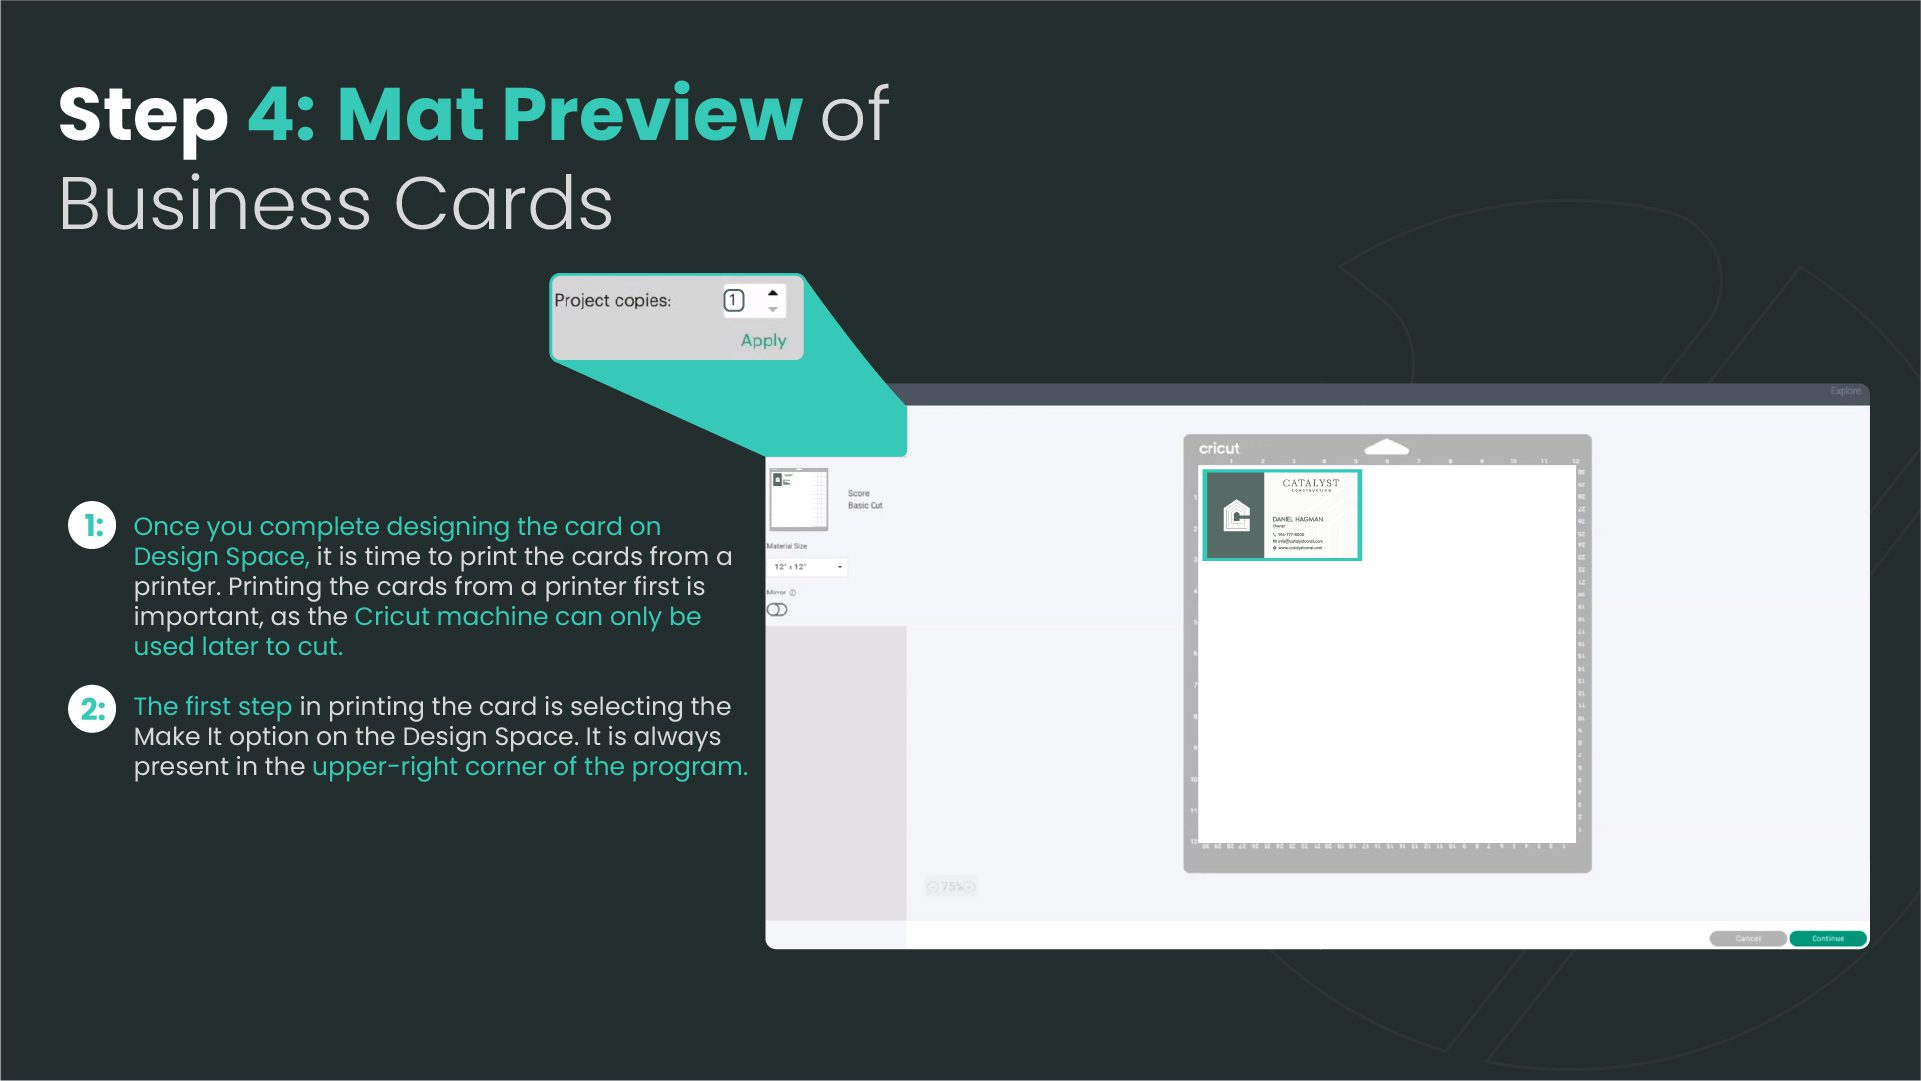
Imagine you’re about to create a masterpiece. Before you start, you need a good canvas, right? That’s what mat setup and material choices are all about in printing. The mat is like a magical carpet that holds your design in place while it’s being printed. You’ve got to make sure it’s just right – not too sticky, not too slippery.
Now, materials – they’re like the clothes for your design. You can dress it up in glossy, matte, or maybe something sparkly. Think about what you’re printing. A fancy wedding invitation? Maybe something shiny. A professional brochure? A classic matte finish could be perfect. It’s all about matching the material to the mood of your message.
Multiplying Your Design: How to Add More Copies
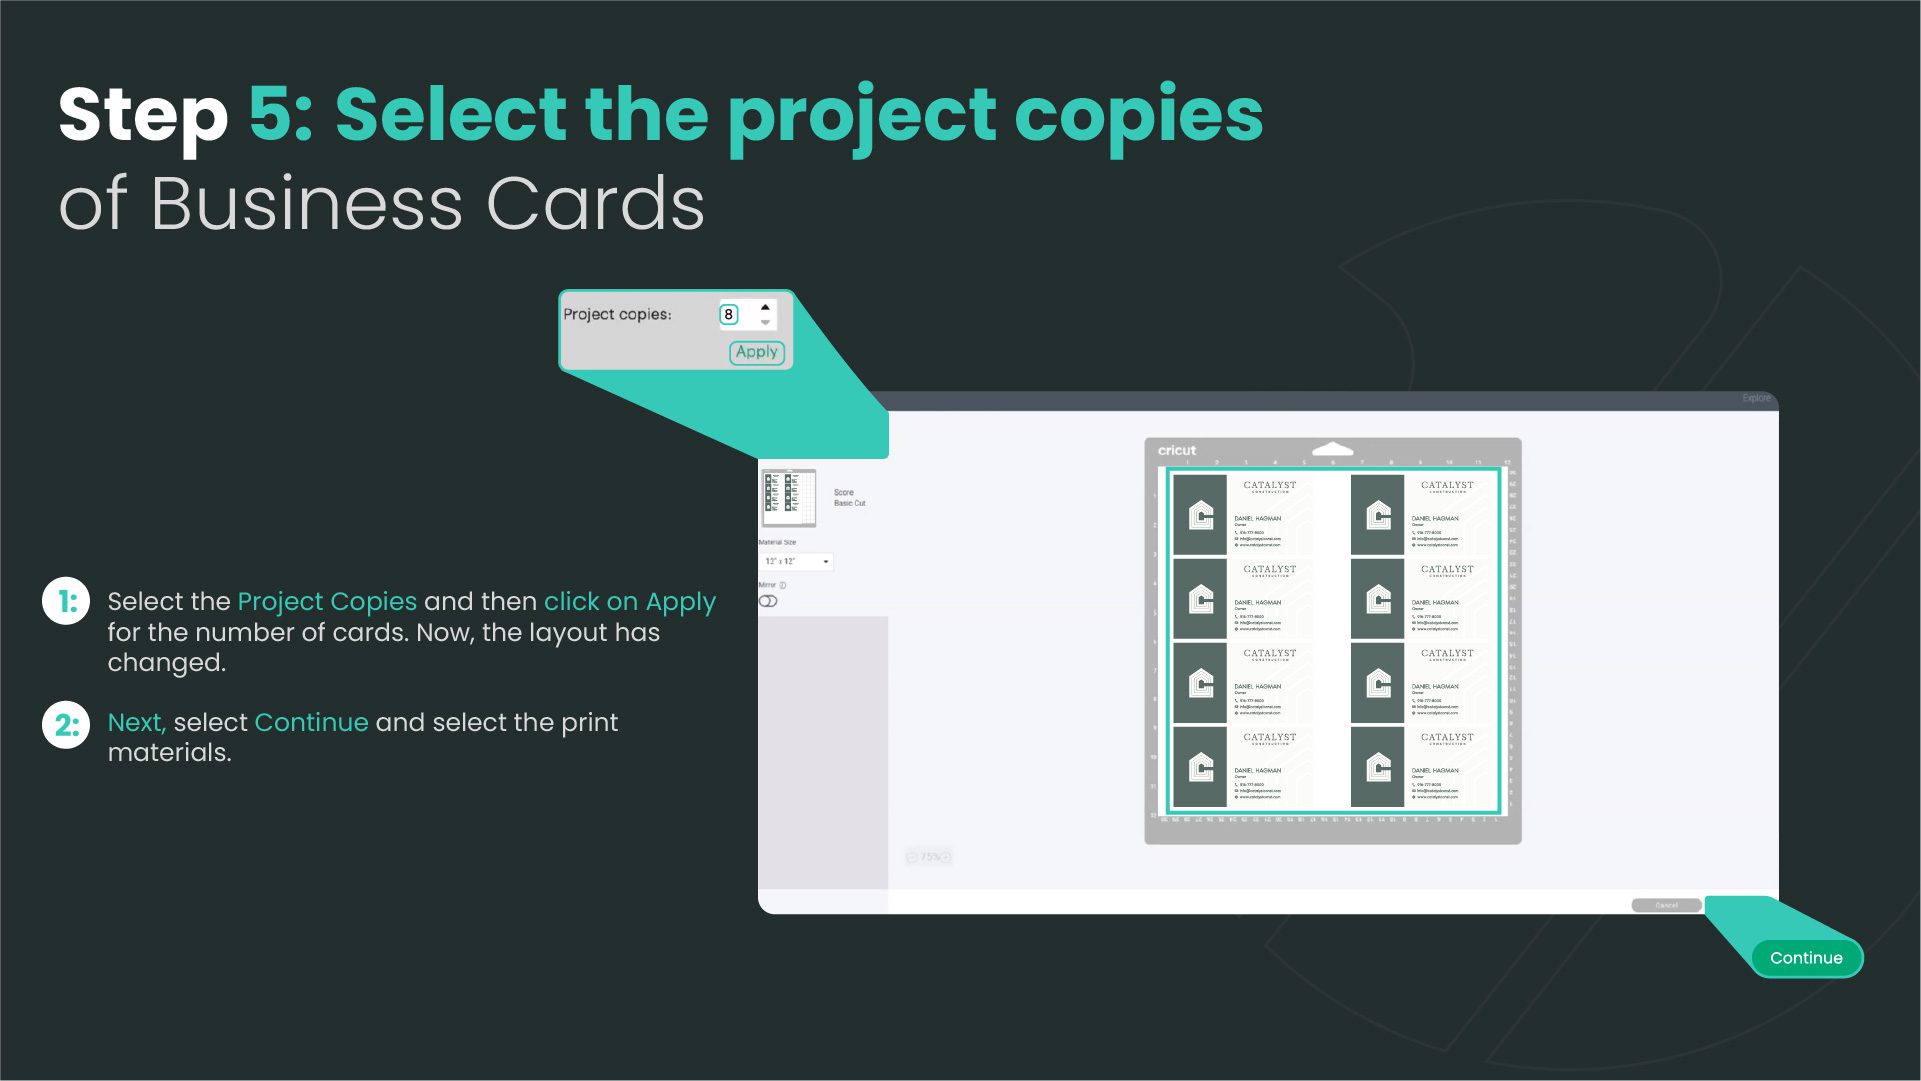
Ever wish you could clone your favorite things? Well, in printing, you can – sort of. Adding more copies of your design is a snap. Think of it like photocopying, but cooler. You’ve got your design ready, and now you need, let’s say, a hundred of them. All you do is tell your printer (nicely, of course) how many copies you need, and bam – it’s like a magic duplication spell. Just make sure your paper stack is full, and watch the magic happen.
The Printing Process: Tips and Tricks
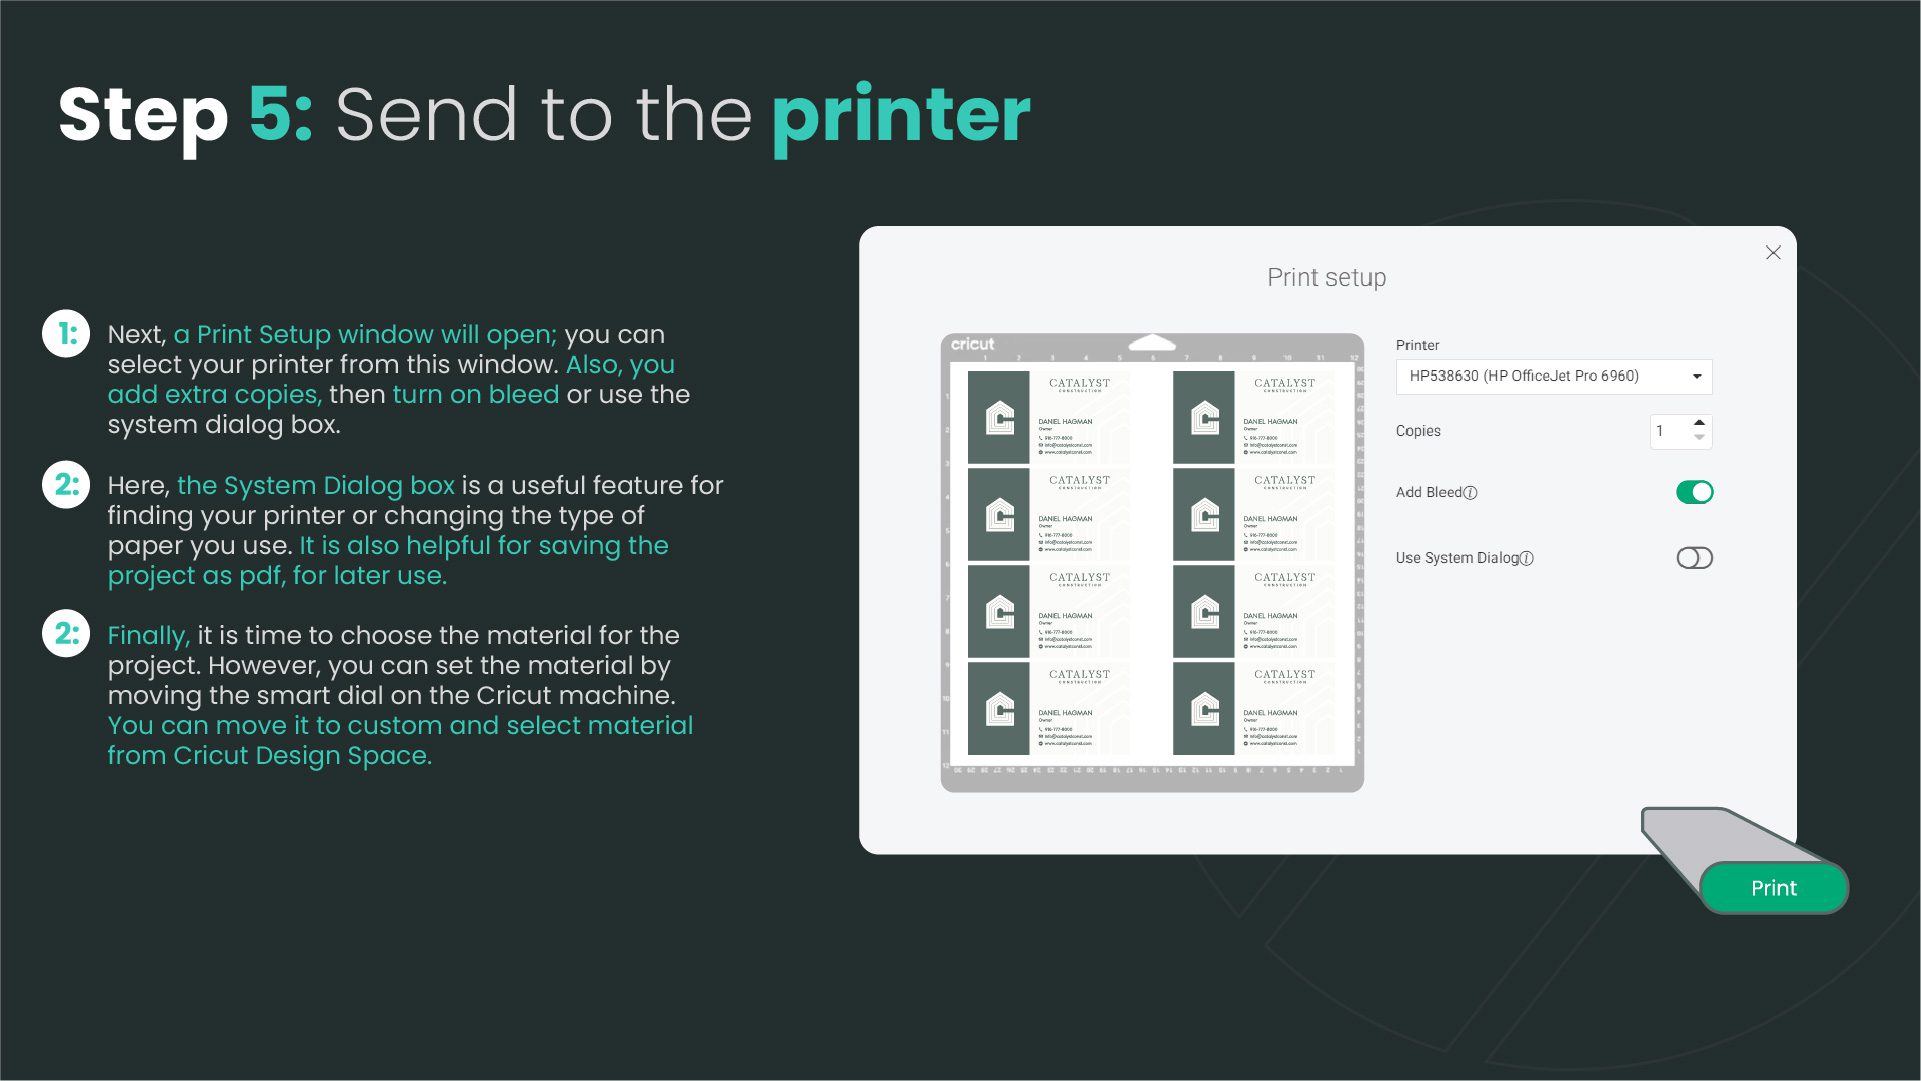
Now, let’s talk about the actual printing process. This is where the magic happens. Picture yourself as a wizard, and the printer is your wand. You need to know the right spells – or in this case, settings.
First tip: Know your printer like your best friend. What makes it happy (like the right paper type), and what makes it grumpy (like trying to print a high-res photo in draft mode)?
Second tip: Patience is key. Good printing isn’t a race. Let the printer take its time to give you the best quality.
And the last trick up our sleeve: Always, always preview your design before you print. It’s like taking a sneak peek before the final reveal. You can catch any sneaky typos or design hiccups.
Choosing the Right Material for Your Business Cards
Business cards are like mini billboards for yourself. You want them to say, “Hey, look at me!” in the best possible way. Choosing the right material is crucial.
Thick cardstock screams professional. It’s sturdy and doesn’t bend easily. Or maybe you’re all about being eco-friendly? There’s recycled paper for that. Want to stand out? Go for a unique texture or finish, like linen or metallic. Remember, your business card is a handshake in paper form – make it memorable.
So, there you have it! A little tour through the land of printing. It’s amazing how a few simple steps can bring your designs to life, isn’t it?
Cutting Process: Mat Preparation and Execution
Step-by-Step Guide through the Cutting Phase
Imagine you’re an artist with a blank canvas. That’s kind of like preparing a mat for cutting. Here’s how you can create something extraordinary:
Choose Your Mat: First, pick a mat that fits your project. Think of it like picking the right size and color of paper for a drawing.
Measure Twice, Cut Once: This old saying is your best friend here. Measure your mat to match the size of your artwork or frame. A ruler or a measuring tape can be your best pals.
Mark Your Territory: Use a pencil to lightly mark where you’ll cut. It’s like drawing a treasure map on your mat.
Secure the Mat: Tape down the mat or use a mat holder. It’s like making sure your paper doesn’t fly away while drawing.
Cutting Time: With a sharp blade, follow your lines and cut. Remember, slow and steady wins the race!
Check and Adjust: Once cut, fit it with your artwork or frame to see if it’s perfect. If not, no worries! Just trim a little more.
Exclusive SVG and JPEG Templates for Custom Business Cards
How to Utilize Free Templates for a Unique Look
Creating custom business cards is like dressing up for a fancy party. You want to stand out, right? Here’s how to use these cool templates:
Find Your Style: Search for SVG or JPEG templates that match your vibe. It’s like choosing an outfit that says, “This is me!”
Download and Open: Once you find the one, download it. Open it in software that supports SVG or JPEG. It’s like getting your outfit ready.
Customize: Now, add your personal touch. Change colors, add your name, logo, or anything that tells your story. It’s like accessorizing your outfit.
Preview and Adjust: Take a look at your design. If it feels ‘not quite right’, tweak it until it’s perfect. It’s like looking in the mirror before you head out.
Print and Impress: Once you’re happy, print your cards on quality paper. Hand them out and watch people be amazed!
Personalizing with Uploaded Templates: A Detailed Walk through
Uploading Your Selected Templates
First off, let’s talk about uploading your chosen templates. Imagine you’ve found this super cool template online that screams ‘you.’ It’s easy to bring this into your design tool. Most software allows you to upload the template with a simple click. It’s like picking out the perfect outfit for your business card – you choose one that fits your style, upload it, and voilà, you’re ready to add your personal touch!
The Art of Ungrouping and Slicing for Custom Designs
Now, here’s where the magic happens. Once your template is uploaded, you can play around with it by ungrouping and slicing. Think of it like a puzzle; you can take pieces apart (ungroup) and cut them into new shapes (slice). This way, you can rearrange elements, change sizes, or even create new designs. It’s like being an artist with a digital canvas, creating something unique and totally ‘you.’
Crafting a Watercolor Effect through Slicing
Ever seen those gorgeous watercolor effects on cards and wished you could do that? Well, you can! By using the slicing tool, you can cut out watercolor shapes or patterns from your template. It’s like using a digital pair of scissors to create beautiful, flowing designs. This gives your card a soft, artistic touch that’s both professional and eye-catching.
Adding and Styling Text with Offsetting Techniques
Text is the heart of your business card. It tells people who you are and what you do. But let’s make it fun! With offsetting techniques, you can give your text a shadow or a 3D effect. It’s like making your words pop out of the card. You can play with fonts, colors, and sizes to make sure your text is not just informative but also super stylish.
Finalizing Your Business Card: The Finishing Touch
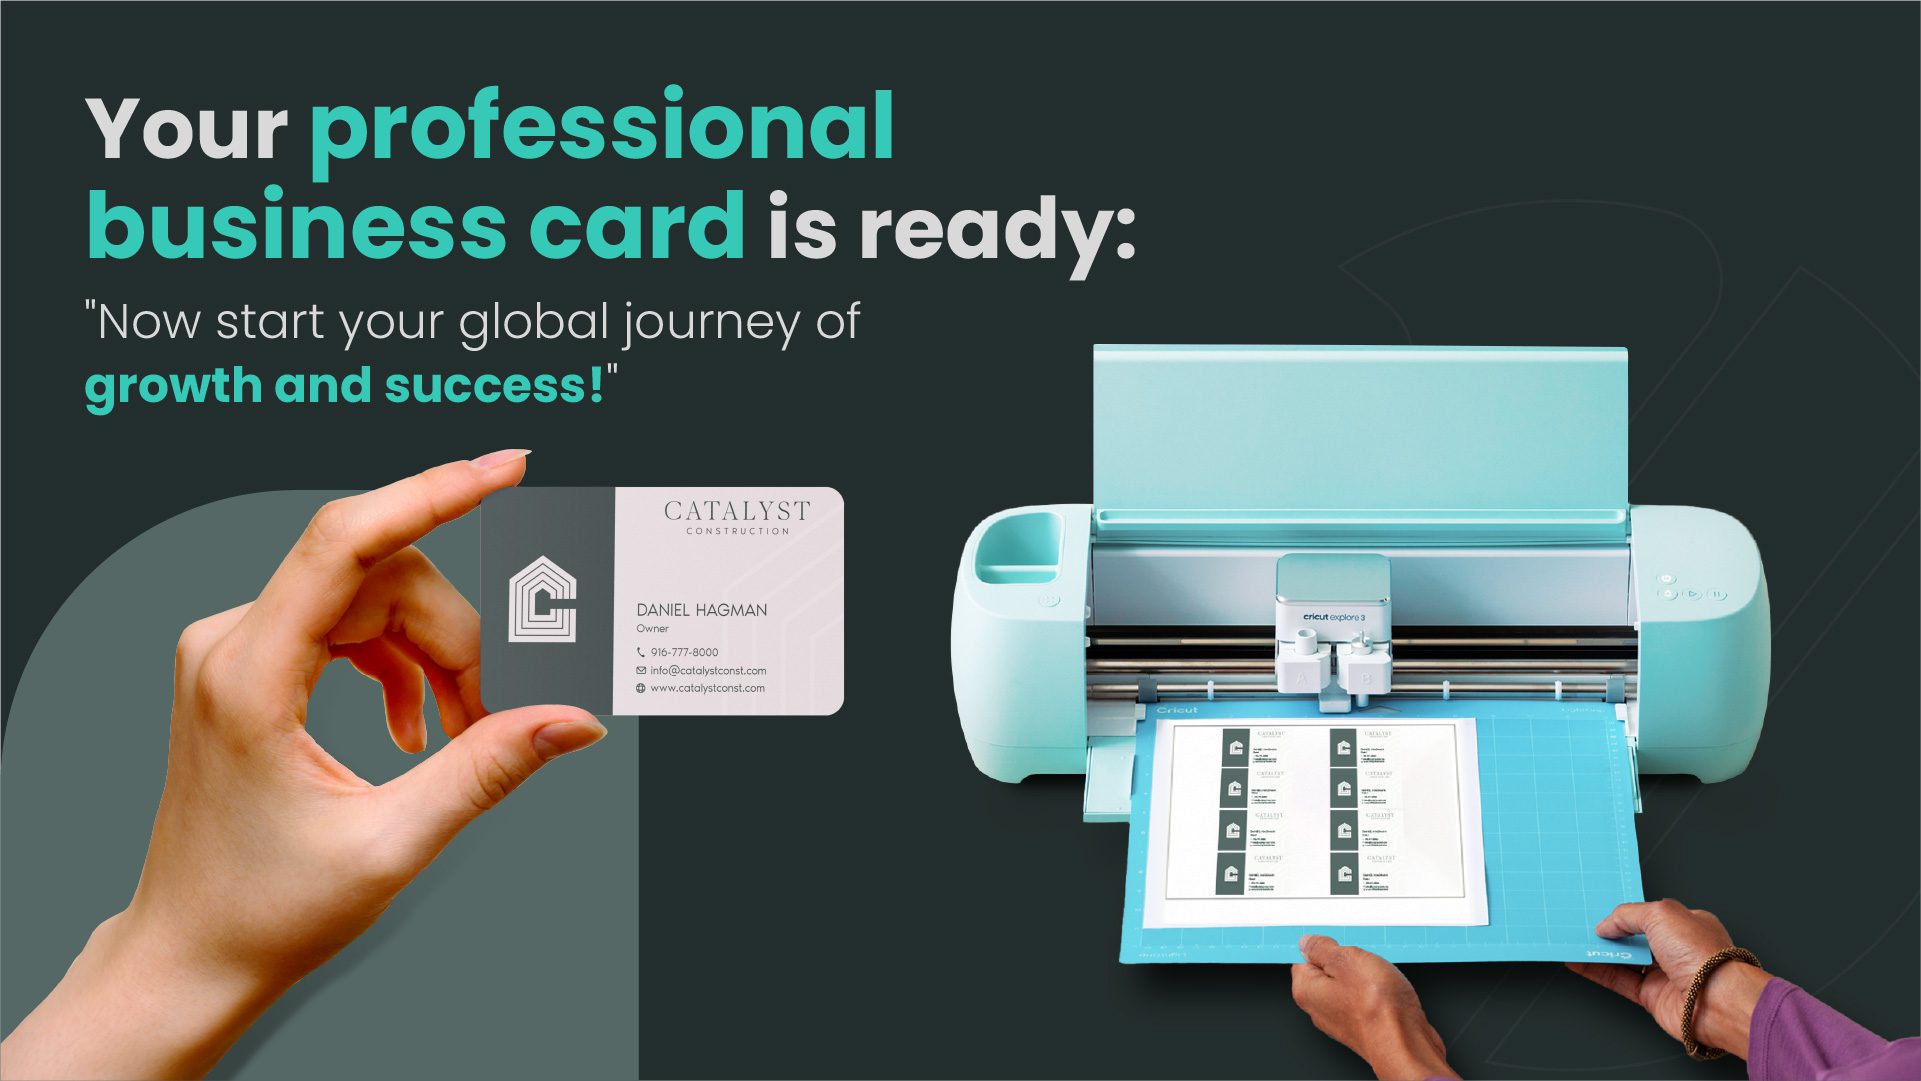
Reviewing and Finalizing Your Business Card Design
Okay, you’re almost there! Now it’s time to review and finalize your masterpiece. Look over your card like an editor. Check for typos, and make sure the design is balanced, and everything looks just perfect. It’s like giving your card a final polish before it’s ready to shine in the business world. Making business cards with Cricut isn’t it amazing?
Imagine you’re at a networking event, and instead of handing out a paper card, you just use your phone to share your contact details. That’s what a digital business card does! It’s a way to share your professional info – like your name, job title, company, phone number, email, and even links to your social media profiles – all through your phone or computer.
So, think of a digital business card as your personal info’s digital twin, ready to be shared with a click or a tap. Isn’t technology amazing?
What do you think about switching to digital business cards?
Conclusion:
Reflecting on the Personal and Professional Benefits of DIY Business Cards
DIY business cards are more than just a piece of paper; they’re a reflection of your personality and professionalism. By designing you card, you show creativity and attention to detail, qualities that are highly valued in any field. Plus, the process itself is so rewarding! You get to unleash your inner designer and create something that truly represents you. Interesting? Turn your business card into a brand ambassador. Our in-depth exploration of business card design principles, material options, and creative trends equips you with everything you need to craft cards that captivate and convert. Don’t just hand out information – make a statement.
So, what do you think? Are you ready to dive into the world of DIY business cards and make a statement that’s uniquely yours?
FAQs:
Is it possible to utilize a Cricut for crafting business cards?
Yes, you can use a Cricut to make business cards.
Can Cricut Air be used for creating cards?
Yes, you can make cards with Cricut Air.
What steps should I take to transform my Cricut into a business tool?
To turn your Cricut into a business tool, follow specific steps based on your goals and needs.
Is it feasible to utilize a Cricut for writing cards?
Yes, you can use a Cricut to write cards.


